Showing posts with label playing. Show all posts

Jan 10, 2012

Red Star Mandala


When I want to create but have little energy, I often turn to the free graphics editing program Sumopaint and make mandalas from images I already have on hand.

This mandala was created from a photo of a painting in progress (shown below).
I really love how the texture of the canvas itself shows up in this mandala and makes beautiful, feathery lines.

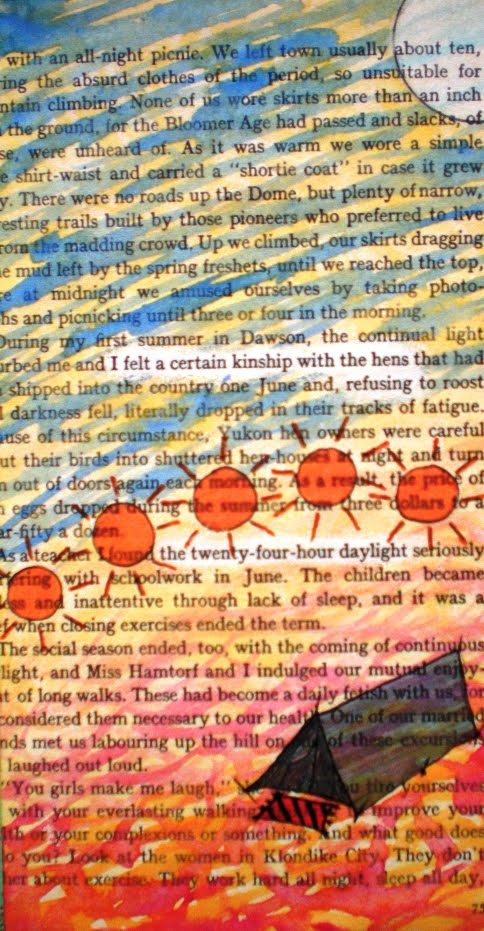
The painting in progress is small and simple so far. I'm enjoying the colours.


Golden Light
5"x7"
acrylic on canvasboard

Aug 9, 2011

Art Journal Bits 1

I felt like sharing a few bits from an art journal I'm working in lately - and loving.
I have so much fun making the backgrounds! It's been totally addictive for me and feels very therapeutic. I get into a meditative state while doing it that far surpasses anything I've gotten from traditional meditation. I'm so totally 'in the moment' that I'm unaware of time passing - sometimes hours.

juicy acrylic backgrounds scraped on with an old credit card

A huge amount of appreciation is beaming around the world from me to Hanna, whose great posts on altering books inspired me to get a great, spiral-bound Tai Chi manual for a few dollars second hand. Note that because my book is spiral-bound, I skipped the step of removing alternate pages.

another background using scraped acrylic, glued in napkins, marker

These backgrounds are so fast and easy - I love using the scraped-on paint method. Pencil crayon goes beautifully over top of acrylic paint.
The nice, thick pages that hold up well to acrylic paint and fun words to leave peeking through paint:


Thanks for the inspiration Hanna!


Jul 28, 2011

Flower Within Mandala


I love this mandala - both the regular and the inverted versions make me smile :-)

created using sumopaint.com
source image (an envelope I decorated by hand):

Apr 7, 2011

In Love With Texture - Sculpture Painting

Now that I am starting to be able to use acrylic paints and glue again as my chemical sensitivities are improving, I am starting to get excited about returning to my first artistic love: TEXTURE building.
I am completely in love with building interesting texture and painting over it.
I use various things to build the texture, gluing on whatever calls to me in the moment.
Tissue paper, fabric, brown paper bags, found objects and dried organic objects like leaves, feathers and seed pods... the possibilities are endless when you have glue and can use it!

Here is a sculpture painting from many years ago that I had a lot of fun making:


And another angle with less glare:


A number of years ago I lived in Montreal which has an amazing system of alleys - awesome places for finding strange little bits of this and that simply crying out to be glued onto something and enjoyed :-)
Most of my 'strange stuff stash' has been packed away, awaiting the day I could use glue again. I think it's time to get it out!


Is there anything you've been saving to use 'one day' that you could dig into right now!?

Dec 1, 2010

Christmas-y Wordle

Have you played with Wordle yet?
I love it. :-)
Basically you go to the Create page, type (or paste) text, hit the Go button and edit how you'd like the words to appear (horizontal, rounder edges, random shape, font, colours etc).  You can edit a custom colour pallette like I did with this Holiday-themed Wordle.  The more times a word appears in your piece of text, the larger it will be.  Therefore, if you want different sized words, you will need to have some words appear more than once.

You can write your own text or play around with copying and pasting poems, songs or writing from online sources.
click to see larger image

  http://www.wordle.net/show/wrdl/2815980/Christmas-y_Words


One of the few things I don't like about Wordle is that it doesn't make an image file you can save.  I got around this by using the ridiculously easy screen shot tool in Windows Vista called the Snipping Tool (which I just discovered today and am very excited about :)
~

Sep 9, 2010

Birthday Collage for a friend

Much more personal than a store bought birthday card :-)

(name at top removed for privacy :) Text reads: "Dear ____, My birthday wish for you is that your year ahead has many calm days, peaceful, rest-filled nights and the energy to play your butt off!"

Text reads: "SEEK YOUR TRUTH... It's likely to be at the heart of something you DeLIGHT in."

Jun 9, 2010

Tutorial: Making Colourful Backgrounds That Won't Warp Thin Papers

I finally created a photo tutorial for the art journal backgrounds I've been talking about.
The technique can also be used in card and tag making, bookmarks, collage, ATC's, handmade wrapping paper or anything you can think of!
I'd love if you shared your ideas in the comments area :-)

This is mostly a 'dry' technique meaning that it won't cause thin paper to warp or buckle when applied.
I do also include a variation of this technique that is 'wet' for those who don't mind buckling or who use thicker paper.  The wet version has some really awesome effects like these (and even more fun ones if you colour-mix):


I confess that I hate typing so I've written the directions right in the photos.  If anyone has trouble reading my messy printing, please let me know and I will type out the directions below each photo.
Also, if you have any questions, please don't hesitate to ask them in the comments area.  I've turned off that pesky comment security device so you don't have to type in any characters before commenting :).

Okay... here we go!


*note*
I should have specified NON permanent markers :-)

*other types of plastic may give different effects - experiment if you like!


Eventually I will post a video showing just how quickly this is actually done :-)  The faster, the better.


WET Technique:


close-up:

~


If you try any of this out and post somewhere online, please share in the comments area!  I love seeing what others do :-)

May 18, 2010

Grunge Star Rubbed Impression Page with Ink Pads and Cereal Box Stars

Did you save the shapes you cut out from the cereal box template project?
If not, you may end up cutting out shapes just to make fun pages like this one!


How To:

Lay a piece of thinner paper (ie printer paper) on a totally flat surface.

Take a stamp ink pad and lightly rub it and drag it around the page until you like how it looks.  *If you have an almost dried out ink pad this will be very easy.
All of mine are newer and the trick to prevent big blotches is to have the pressure so light there's almost none... and keep it moving!*

Repeat with as many colours as you like - preferably working from lighter to darker if you care about contaminating the lighter pads with darker colours.

When you like how it looks, take your cereal box shapes and lie them under the paper.


Take an ink pad of a darker colour (or the same as the most dark you have used so far) and rub over top of the paper in the area of the edges of the shapes until you like how it looks!

So simple and easy!

In the basic image above I just used 2 colours and only used the cereal box shapes on the final layer but you can play around to make this much more saturated, with shapes on various layers like this:


It only takes minutes to do but be warned - it's so much fun it can be addictive!
Now I just need a project to use these pages... which I will likely have way too many of soon :-)

If you do something like this and post on your blog or site, please let me know in the comments!  I'd love to share the links for readers.

Apr 1, 2010

Cute Paper Flower... King Arthur had a parrot!

Did you know that King Arthur, of legend, had a pet parrot?
Neither did I!
I bought an Arthurian Mythology book for 50 cents recently to use for altered pages and that tidbit popped up on a page I was using to paint background to use for paper flowers.
I've seen paper flowers on a few different sites and decided to try my hand at making one. You can make them more 3D than this but I wanted to be able to mail it in a regular envelope to a friend.


Here's the front, it hangs on the wall by a string:


Once I realised that I needed a bead on the back to tie the knot to, I decided I may as well make the back look not half bad (but not so nice that my friend would have trouble deciding which should face out:).
The back view:


After I strung the flower, I spun the layers around until I liked how they were, then used dabs of gluestick under each petal to hold them in place.

It lies almost flat on the wall.

There are infinite possibilities for paper flowers or non-flower decorations!
I love having something funky that can fit in an envelope to brighten someone's day.


Materials:
watercolour paint
page from book
scrap paper
double-sided cardstock (middles layer)
homemade 'milk paint' (food colour and evaporated milk with extra milk powder added)
string
sequins
beads
scissors
gluestick
sparkles

Mar 24, 2010

Altered Page with soy wax resist

I fell in love with altered pages at the wonderful, rich, joyful and delicious blog Raven Moon Magic via her Paper Moon work.

As always, I am held back from trying new things by my need to 'get it right' on the first try.
I've been trying very hard to get past this limitation and succeeded in this case.
I tried my first altered page recently and did all sorts of things 'wrong' but it made for a great learning experience.

I kept feeling like I 'should' add something more to all of the empty space but nothing is coming to me and I really love the way it looks as is so I am leaving it alone :-)

One of the things I did 'wrong' was to not bother taping the page down evenly.  I will make sure to do that in the future.


Tips:
1.  if you will be using any wet medium on the page, use a book that has thicker pages
2.  tape it down using painters tape
3.  do not remove tape until page is entirely dry.  this will make the page less wobbly or warped from the moisture.
4.  remove page from book carefully (another thing I didn't do well :)
5.  you don't need to use a wax resist to bring out the words - I just preferred that because then I could paint at will and not worry about going carefully around the words
6.  pick words based on what you are drawn to - NOT what 'makes sense'!
7.  the words do not have to tie in with the painting in an obvious way
8.  if using watercolour paint, you can either do the painting first and pick words later - removing the paint over those words with water, or you can pick the words first and do the painting after.  You can see an example of how this will look by the moon in the upper right corner of this piece - the colour was removed after painting. 
*note* some stain will remain.

Mar 23, 2010

Spring Flower Collage

I haven't been posting much though I've been doing a lot artistically... and craftily ;-)

Here's a photo of a collage I did a few weeks ago when it finally began to feel like spring would come to southern Ontario!


Normally I'm very perfectionist about collage (and art in general) but with this one I tried to let myself go and not worry about it being 'perfect'.

Mar 15, 2010

Using wax as a 'resist' in watercolour paintings

I've not been posting much but have been daily drawing, colouring, painting and more.☺

I've tried a number of different waxes as a 'resist' to use with watercolour paints.

So far, crayons did not work well, beeswax worked okay but is very hard and needs to be scraped down after application or it kind of flakes on top and doesn't resist well.
My favourite wax so far is soy wax. I had some around in the form of run off from a soy wax candle and  it works wonderfully!
Soy wax is very soft compared to beeswax and it glides onto the paper nicely without heavy pressure.
The resist does still work best if the wax is pressed down after application - I do this by running the flat back of my thumbnail over it but one could use any flat, hard object that would not damage the paper.

You can use wax directly on the white paper so that the wax lines will show up white (or whatever colour your paper is).  That's what I've done here with the front and back of a bookmark:


or, if you have the patience, you can paint a layer of lighter colour, wait for it to dry (or use a hair dryer on low - keep it moving to avoid scorching the paper), then use the wax over top.  Then you can paint overtop with darker paint colours like I did with the back piece of a page that is destined to be cut up into whimsical bookmarks (squiggly side is back piece done with the lighter and darker paint method, spiral piece is done with the wax directly on the unpainted paper):


Another thing you can do with wax and watercolour is a bit more complicated but tons of fun.
You can draw on the paper first with markers or coloured pens, go over the marker with wax, then use just plain water on a brush to pick up any marker not covered by wax (dab with paper towel if needed), then paint.  If the markers are waterproof such as Sharpies etc, you don't need to to the stage of picking up excess marker with water.
If they are water soluble markers, this stage is necessary unless you don't mind ending up with muddied, icky colours when you paint - the marker colour will mix with your watercolour paint. (I found that out the hard way :-)

a few examples of playing around with that technique:

Space Cucumber Ship
watercolour, marker, beeswax
If you try this out and post on your site/blog, I'd love if you post links in the comments area!  I'd love to see what others do with this.
Related Posts Plugin for WordPress, Blogger...

Followers