Showing posts with label how-to. Show all posts

Jun 30, 2012

Make Your Own Stencil For Fabric Painting - Condor Shirt


How are you all dealing with the heat and humidity?  Today I distracted myself with a new creative project.

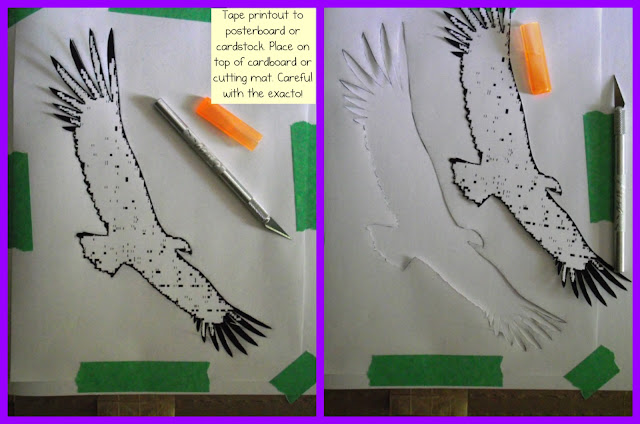
I am really drawn to condors and I decided to try making a stencil that I could use for putting a condor silhouette onto a Tshirt.  I know that some people use freezer paper for this.  I didn't have any and I also wanted the stencil to last through many uses so I decided to use poster board.  You could also use bristol board or thick card stock.  This is the first time I've used Tulip fabric spray paint and it was much thinner than I expected.  I don't know if the poster board will last through the first use without warping so I plan to put a coat of acrylic paint on both sides first.

I found a condor silhouette that I liked using Google Image search.  Then I edited it in Paint to remove most of the black (saves printer ink).

Here are photos and notes of the process.  If you can't read the text, please click on the image to make it larger - the blurriness goes away.


I'm really happy with the results!  :-)

Photo collages and effects created using the free program http://fotoflexer.com

Aug 2, 2011

Feather Eraser Stamp (hand-carved)

All wrapped up and ready to send to a lovely woman who inspires me
(I forgot to take a photo of the stamp itself before wrapping it up... oops! :-)

Have you tried carving your own stamps from erasers yet?
It's so much fun! I love using them in art journals, on cards, envelopes, and other paper crafts.
T
hey also make wonderful, personal gifts.
Vinyl erasers work best and if you think you'll do this more than a few times, it's totally worth the money to buy a linoleum cutter (also called Lino cutter). I have the Speedball one shown in this photo.


It has a number of different tips to choose from and I find it very handy how they can all be stored in the handle. No chance of losing them. You can carve stamps using utility/exacto knives but a cutter like this is much safer and sooo much easier.
After only a few stamps, it will have paid for itself. I tried a few different kinds of vinyl erasers before settling on one I liked. This one cuts like butter. So smooth. And it's not scented - unlike most that I tried. Ick.

There are many tutorials online. Here are a few(note that you can also use carving blocks sold at art or printing stores. It's nice to begin with erasers because they are so cheap you may be less held back by fear of messing up!):
I saw this video of Geninne's only after I carved my feather stamp. Hers is amazing! (of course :)
Geninne in action

non-video tutorial part 1
non-video tutorial part 2

I confess that I don't have the patience to draw the design first and transfer it onto the eraser as shown in those tutorials. I draw directly on the stamp or just freehand it without drawing at all.

*Tips*

1. If you wear a cotton glove on the hand holding the stamp, you're less likely to get cut if you slip. This may seem unnecessary but it's totally worth it in my opinion :) Those blades are supr sharp.
2. If you will be carving curved lines, it's much easier to have the eraser on a small piece of paper that can slide around easily - then you can twist/turn the eraser itself as you go around corners rather than trying to move the cutter in a smooth, curved line.
3. Start gently. You can always cut deeper later but you can't add back parts you've removed!
4. When you are first getting the hang of this art, you can use all sides of the eraser to practice on. It will save money and be kinder to the environment.
5. If you create any kind of mixed media art, you can also save the shavings you carve off the eraser, mix them with glue or gel medium, and create very funky background textures for paintings etc.


Have fun!

Feb 20, 2011

Super Simply Sewn Satiny Scarf forThree Dollars

I adore all things shimmery, satiny, sparkly and metallic. I also love flowing clothing that moves when I do. At the same time, I'm a bit of a tomboy - the type who likes climbing trees, can't wear white without getting it dirty, washes all colours together in the laundry, and has zero tolerance for clothing that is uncomfortable. Fragile clothing, worn by me, invariably gets damaged. I choose jewelry based on how unlikely it is to get caught on things or banged up in the garden :-) When I see women with rings that stick up, I instantly think, "How do they handle that? It would bang into everything!"

I've been eying the many styles of scarves in stores lately and most of them are either made from material that feels scratchy or are so fragile they would fall apart in the wash (I also have low tolerance for clothing that can't just be tossed in the washer with everything else :).
The scarves out now are also pricey! It feels wrong to me to spend $15-20 on a tiny piece of fabric that would cost about $1 to buy.

So I decided to buy fabric and try making my own! My sewing skills are basic and I don't have patience with patterns and pinning so my creations sometimes work... and sometimes don't.

Thankfully this experiment went pretty well.

This lovely fabric shimmers in the sun and has a beautiful, satiny feel to it... yet it's made from polyester and can be tossed in the washer and dryer - yay!

widthwise seam, inside

I didn't take a photo of the first step which was to cut half a meter of fabric in half, lengthwise and sew two ends together widthwise. You can see those ends sewn together vertically in the photo above.

lengthwise seam inside

Then I had one long, narrow piece of fabric about 10 inches wide. I folded it in half with the right sides together and sewed the 2 'wrong' sides together. I didn't bother pinning, just matched up the sides as I went along with a simple straight stitch. The fabric was not cut evenly at the store so it's not even but it doesn't show when it's being worn.

widthwise seam, rightside out

That photo above is how the outside seam looks where the 2 long pieces were joined widthwise.

lengthwise seam rightside out, unironed

When I was done sewing lengthwise, I had a long tube with both ends open. At that point, if you wanted closed ends, you would sew one end closed all the way and the other end closed except for a few inches (then pull the tube rightside out through the small opening and handsew it closed). I wanted my ends left open so at this point I simply turned the long tube rightside out... and I was done! I could have ironed it so that it will lay flat but I really like the body and fullness it has and I don't want to flatten it one bit :-)

big, long tube scarf, outside


The ends didn't match up perfectly and I'm not sure what I'm going to do about that yet. I'm pretty laid back so I may just leave it :)


Total cost for this project:
only
$3
(for the fabric)


*I've never tried to describe a sewing project in text before so if you have any questions or would like me to clarify something, please do not hesitate to let me know in the comments :)

Dec 8, 2010

A Fun and Frugal Holiday Garland


When I first began working on Christmasy projects a few weeks ago, I had a hard time deciding whether or not to post them on my blog.  I'm not Christian but I love so many things about this holiday.  Since I have a hard time with words, I'd like to borrow from Christie of Grace is Overrated, who perfectly expressed what I had been feeling on this topic.  In a recent post she said, "I didn't want to offend those who might celebrate differently than I do or not at all, for I know that Christmas is not a universal celebration.  Most of all, I want this to be a place where we all feel welcome and appreciated and included."
Thank you Christie, for saying that so well!
I hope that those of you who don't celebrate Christmas will not feel hurt or excluded.  If you'd ever like to adapt one of my projects to a holiday or event you celebrate and want ideas how, please contact me - I'd love to brainstorm.  :-) If you adapt a project and share it online somewhere, please let me know in the comments so I can link to it!  I would love that.
This project in particular lends itself well to any occasion one wants to decorate for.  I love it so much that I plan to make one in rainbows to have up at all times.  Not to celebrate anything (well, I suppose to celebrate my love of rainbows :)

I originally planned to make this garland by punching circles from cool paper and gluing to a string.  I quickly discovered that I didn't have the patience to get the gluestick on the circles and line them up on either side of the string before the glue dried... at least not for the time it would take to make 12 feet of it!  I had the circles all punched out and was very disappointed until I had a sudden brainwave...
Stickers. 
No glue.  No punches.  EASY!  And best of all, FUN because I love stickers.

This holiday garland has some parts that could easily be done by children and some best for adults.

Supplies:

  • tape (I use painters tape because it is easy to unstick from walls, string, fingers etc)
  • 1 package of coloured circle stickers (any colours you like)
  • thread or string (any colour you like - I used silver because I like sparkly things)
  • Optional:  1 package of coloured metallic star stickers (or any sticker you like that is smaller than the circles)

I already had thread and tape on hand so this garland cost about $2 in stickers bought at a dollar store.  If you use only circles, it would be around $1


Step 1. (kid-friendly)

Stick the star stickers onto the circle stickers.  You can use contrasting colours.  I decided I liked how it looked best when the star was the same colour as the circle.  This photo doesn't show it well but when the light hits the stars, they reflect.
They don't need to be even - this step could easily be done by any age of child that could be trusted with stickers.
Idea: children could also draw on a few of the circles instead of putting stars on them.  They may enjoy later picking out their drawings as they look at the garland.  Another option is to spell out words - 1 letter per circle.


Step 2.

Tape a length of string between 2 walls in a corner.  You could also tape one end to a table and the other to a wall. If you leave the string attached to the spool, then you don't have to calculate how many stickers will fit on what length, just keep on sticking until they are used up!
If you look closely on the left, you can see that I experimented with having circles and stars alternate on the string - it was much too finicky to get the stars to match up evenly so I abandoned that idea.  You can also see that I didn't immediately think of putting the stars on the circles before attaching them to the string!  Trust me, it's way easier to do Step 1 first :-]


Step 3. (not so kid-friendly)

a) Stick the stickers to one side of the string.    I stuck one on the string, pressed the string firmly onto the adhesive and was able to let go while I got the other sticker from the sheet.  This may not work as well if you were using a heavier weight of string. It doesn't have to be in the exact centre.
b) Stick a matching colour of sticker to the other side of the string, lining it up as close as possible to the first sticker.  Don't stress out if they don't match up perfectly.  Once I hung mine, I couldn't even see the mistakes.
c) Decide how far apart you want to space the stickers and repeat steps 3 a) and b) until your garland is as long as you want!

I made a big long garland but this would also look very nice in many shorter strands hanging down vertically from a ceiling.  I used my experimental alternating star/circle piece to hang down from the centre of the garland.


To prevent tangling:
As you fill up the length of string you have taped between the 2 walls, you can loop the finished pieces and tape to the wall like this:
To store:  I will wrap it around a piece of cardboard that I've made notches in each end of, then put in a file folder or envelope.  You could also wrap it around an empty paper towel roll as shown in the photo on this blog: Polka Dot Garland


Hanging: 
When made with thin thread, this garland is very light and airy.  It is held up to the ceiling with Scotch tape and has not threatened to fall down.  I doubt the entire 12 feet would hold with just 2 pieces of tape but I hung it in scalloped sections and it's holding well.


If you try this project, or a variation on it, and post online, I'd love if you'd comment with a link!

Happy decorating!

Jun 9, 2010

Tutorial: Making Colourful Backgrounds That Won't Warp Thin Papers

I finally created a photo tutorial for the art journal backgrounds I've been talking about.
The technique can also be used in card and tag making, bookmarks, collage, ATC's, handmade wrapping paper or anything you can think of!
I'd love if you shared your ideas in the comments area :-)

This is mostly a 'dry' technique meaning that it won't cause thin paper to warp or buckle when applied.
I do also include a variation of this technique that is 'wet' for those who don't mind buckling or who use thicker paper.  The wet version has some really awesome effects like these (and even more fun ones if you colour-mix):


I confess that I hate typing so I've written the directions right in the photos.  If anyone has trouble reading my messy printing, please let me know and I will type out the directions below each photo.
Also, if you have any questions, please don't hesitate to ask them in the comments area.  I've turned off that pesky comment security device so you don't have to type in any characters before commenting :).

Okay... here we go!


*note*
I should have specified NON permanent markers :-)

*other types of plastic may give different effects - experiment if you like!


Eventually I will post a video showing just how quickly this is actually done :-)  The faster, the better.


WET Technique:


close-up:

~


If you try any of this out and post somewhere online, please share in the comments area!  I love seeing what others do :-)

May 18, 2010

Grunge Star Rubbed Impression Page with Ink Pads and Cereal Box Stars

Did you save the shapes you cut out from the cereal box template project?
If not, you may end up cutting out shapes just to make fun pages like this one!


How To:

Lay a piece of thinner paper (ie printer paper) on a totally flat surface.

Take a stamp ink pad and lightly rub it and drag it around the page until you like how it looks.  *If you have an almost dried out ink pad this will be very easy.
All of mine are newer and the trick to prevent big blotches is to have the pressure so light there's almost none... and keep it moving!*

Repeat with as many colours as you like - preferably working from lighter to darker if you care about contaminating the lighter pads with darker colours.

When you like how it looks, take your cereal box shapes and lie them under the paper.


Take an ink pad of a darker colour (or the same as the most dark you have used so far) and rub over top of the paper in the area of the edges of the shapes until you like how it looks!

So simple and easy!

In the basic image above I just used 2 colours and only used the cereal box shapes on the final layer but you can play around to make this much more saturated, with shapes on various layers like this:


It only takes minutes to do but be warned - it's so much fun it can be addictive!
Now I just need a project to use these pages... which I will likely have way too many of soon :-)

If you do something like this and post on your blog or site, please let me know in the comments!  I'd love to share the links for readers.

May 14, 2010

How To Make A Drawing Template From A Cereal Box

Some people can draw crisp, clean shapes freehand.
Not I.
:-)

If I want a reliable, nicely drawn shape or line, I use a drawing template or ruler.
These are normally made from stiff plastic and are very durable.
At the moment, I have ones for circles, ovals and curvy lines.
I have been wanting ones for stars but am on a budget and felt like I couldn't justify the cost.
Instead, I decided to try making one from an old cereal box!
It won't be quite as durable as a plastic one but when it becomes unusable, I can simply recycle it and make another.

I used a cereal box but you could use any thick, firm 'boxboard' such as a facial tissue box, cookie box etc.  It needs to be thicker than cardstock paper.  I don't think this would work well with corrugated cardboard - it may be too flexible.

If you can draw well, you can draw shapes directly on the cereal box.
Or you can do as I did and print out shapes to use (many free templates can be found by searching Google with words like "free printable templates").
If printing, cut loosely around the shapes, leaving some of the printer paper around the shape - this will help you know where you have cut because the printer paper will be cut away.
In the picture below, the star on the right has already been cut out though I haven't popped out the piece yet.

Attach the shapes to the cereal box with a dab of gluestick.  This makes sure the paper doesn't slip while you are cutting.  You don't need to glue every bit of it though you can if you want.
Make sure you leave space between the shape and the edge of the cereal box - this will help the template be stronger.


Using a sharp exacto or utility knife, carefully cut along the outline of the shape.
I know you know this but I have to say, "Please be careful not to cut yourself!  Keep fingers, thumbs and other body parts out of the path of the knife" ;-)
I use a metal ruler as a guide - the cork that is normally on the back of these rulers has been removed so that it lies perfectly flat to the paper.
Cut from the outside edges of the shape towards the centre - that way you don't have to worry if you cut a bit too far - the extra cut will be into the centre piece that will be discarded at the end.
When you are done cutting around the shape, gently press from the bottom up to loosen the centre piece.
*If there are bits of the corner still attached, carefully cut them with an exacto knife.  Pop out the shape, trim any rough bits, trim the edges off the cereal box, recycle the scraps (or use them for one of the ideas mentioned below) and you're done!


In this second picture you can see the utility knife I switched to when I realised my exacto wasn't sharp enough to cut easily.  You can also see a 15-point star I drew using the small star template.
I still have room on this template to ad a few small stars.

*This template could be made stronger by gluing 2 layers of cereal box together.*

If you didn't cut too far into the centre of the shapes, you can use them for other crafts!

Here's one fun way I've used them so far:
Grunge Star Rubbed Impression Page

Other Possibilities: 
  • collage on one side of the shapes and glue into an art journal page
  • collage both sides and hang from a string somewhere just for fun
  • cover both sides in some kind of pretty handmade or cardstock paper, decorate with sequins, beads, jewels etc... hang on a string
  • glue onto canvas before painting to add depth/dimension
Do you have any other ideas for using the cut-out shape?
Tips to make this template process better/different?
Did you try this and post on your blog?
Please share in the comments area :-)
Related Posts Plugin for WordPress, Blogger...

Followers