Showing posts with label fun. Show all posts

May 21, 2012

Painting On Raw Canvas - Experimentations

Raw canvas was on sale at my local art store recently for $0.75/foot.  I was able to get two 3'x5' piece for only $7.50!!  Wow.  I've always wanted to paint on a larger size of canvas but was daunted by the price of big stretched canvases.
Raw  or 'unprimed' canvas hasn't been painted/primed with gesso so it will soak up paint like mad.  This makes it not as inexpensive as it may seem because you will spend a lot in paint when you use it.
I did some experimenting to find ways around this and am sharing the results, so far, with you here.  This is an incomplete work in progress.  I intend to leave this unstretched and use it as a wall-hanging when complete.

1. I washed the canvas in hot water with laundry soap and baking soda. I didn't wash anything else with these because I didn't want them to get bunched up and crease badly.  I did not to use fabric softener.
2. Cut away shredded bits that had frayed at the cut ends.  Then I dried the canvas in the dryer (once again NO fabric softener - it can prevent paint from adhering).
3. Removed from dryer right away and ironed.  This would have been hard on an ironing board so I used the kitchen table.  Because I had 2 pieces of canvas, I doubled them over so there were 4 layers of canvas between the table and ironing board at once, then flipped, rotated as needed to iron all of the canvas.  I used a spray bottle to dampen the canvas and high heat.

What I was left with: the washing, drying and ironing shrank the canvas a bit and made the weave tighter.  Exactly what I was hoping for.

My plan was to use watered down super cheap paint to cover the canvas so that I could paint on it later with less cheap paint.  However, I think I am liking the look of this so much, that it will become the actual painting - not just a background.  I used the Michael's store brand 2oz bottles that cost $0.69/bottle.  I've covered tons of the canvas so far and used less than 5 bottles!  Assuming I use 6 by the time I am done that will be $4 of paint.  Far more affordable than gessoing the canvas.

I planned to make a big mess so I took this project out onto the deck with an old sheet under it (and books to weigh down corners due to wind).


I did some weeding:
 detail of weeds which will serve as a 'resist', leaving areas unpainted under them:

Acrylic paint mixed with water (a bit more than half water) and sprayed using the Tulip Fabric Paint Cannon:
 Spraying a layer of pink:
 Adding a few objects and then spraying yellow:
 Spraying white, then removing all objects:
 detail of weed resist area:
By this time I had a blister on the finger that had been spraying so I put away the sprayer. I put paint and water into empty paint bottles and shook them up to make very watery paint (about half and half paint:water).
I waited for the top layer to dry - very fast since it was a sweltering hot, sunny day.
Then I flipped the canvas over and and began applying the paint to the back with a big brush, adding water as needed with the brush.  This side looks very primary but I will paint over it later and this canvas will become double-sided - I can rotate it on a whim :)
 I chose where I put the big washes of colour on the back because I wanted it to bleed through in specific places on the front.  For example I wanted the weeds to be greenish.
 With this technique, what happens is that the paint on the front blocks colour from bleeding through from the back.  The paint from the back only will bleed through onto any remaining parts of canvas that are still raw.  It ended up having a far cooler effect than I had expected and I'm really excited about it :-)


One of the parts of this piece that I love most is the way the colour gradation shows through in the three diagonal lines in the corner:


 I put my second piece of canvas under the piece I was painting part way through - as soon as I saw what cool effects were bleeding through onto the old sheet.  I wanted them on the blank canvas instead!

Would I do anything differently if I did this again?
Yes - first of all I would use more than one finger for holding down the spray nozzle!  :-)
I also would leave more areas raw, with only sparse splatter on them, because of how much I love the bleeding through effect.

Mar 26, 2012

Arashi Shibori Style Tshirt Alteration

Something I've been loving recently is using a silk dying technique called Shibori.

I use very watered down acrylic paints as a fabric paint rather than fabric dyes and I'm using non-silk fabric so what I'm doing isn't actually Shibori - but that is what has inspired and informed me.

The particular Shibori technique I've been using is called Arashi aka Pole Wrapping. Usually it's done on a diagonal but with this Tshirt, I've done it vertically. I wasn't too careful about making the top of the paint be in an evenly horizontal line which is driving me a bit nuts but I don't notice it much when I wear it so hopefully I will be able to ignore it :)

For those interested in trying this, I didn't even buy any special supplies (eg PVC pipe, sinew or waxed twine).

I covered an old cardboard tube with a plastic bag (so it wouldn't get soggy when it got wet) and used a rubber band to hold each end of the shirt on and used waxed dental floss to wind around. I'm sure twine would be easier on the hands (dental floss is so thin and my fingers were pretty sore afterward) but I like using what I have on hand. When I'm done, I unwrap the floss and wind it onto an old cardboard toilet paper roll to re-use for future Shibori :)

Because the paint was applied by hand to a mostly dry Tshirt, most of the colour stayed on the top exposed layer of the shirt. When using a dye bath or having the shirt very wet first, more of the colour will spread through other layers.

I washed and dried once before wearing. I've had great success using inexpensive acrylic 'craft' paint instead of fabric paint. It does need to be watered down to avoid being stiff or crunchy. I've never used any of the additives you can buy to 'transform' acrylic paint into fabric paint.

This was a plain orange Tshirt and I was hoping for a flame-like effect along the bottom of the shirt:

Check out this great post showing various Shibori techniques: DIY Shibori

Aug 9, 2011

Art Journal Bits 1

I felt like sharing a few bits from an art journal I'm working in lately - and loving.
I have so much fun making the backgrounds! It's been totally addictive for me and feels very therapeutic. I get into a meditative state while doing it that far surpasses anything I've gotten from traditional meditation. I'm so totally 'in the moment' that I'm unaware of time passing - sometimes hours.

juicy acrylic backgrounds scraped on with an old credit card

A huge amount of appreciation is beaming around the world from me to Hanna, whose great posts on altering books inspired me to get a great, spiral-bound Tai Chi manual for a few dollars second hand. Note that because my book is spiral-bound, I skipped the step of removing alternate pages.

another background using scraped acrylic, glued in napkins, marker

These backgrounds are so fast and easy - I love using the scraped-on paint method. Pencil crayon goes beautifully over top of acrylic paint.
The nice, thick pages that hold up well to acrylic paint and fun words to leave peeking through paint:


Thanks for the inspiration Hanna!


Aug 2, 2011

Feather Eraser Stamp (hand-carved)

All wrapped up and ready to send to a lovely woman who inspires me
(I forgot to take a photo of the stamp itself before wrapping it up... oops! :-)

Have you tried carving your own stamps from erasers yet?
It's so much fun! I love using them in art journals, on cards, envelopes, and other paper crafts.
T
hey also make wonderful, personal gifts.
Vinyl erasers work best and if you think you'll do this more than a few times, it's totally worth the money to buy a linoleum cutter (also called Lino cutter). I have the Speedball one shown in this photo.


It has a number of different tips to choose from and I find it very handy how they can all be stored in the handle. No chance of losing them. You can carve stamps using utility/exacto knives but a cutter like this is much safer and sooo much easier.
After only a few stamps, it will have paid for itself. I tried a few different kinds of vinyl erasers before settling on one I liked. This one cuts like butter. So smooth. And it's not scented - unlike most that I tried. Ick.

There are many tutorials online. Here are a few(note that you can also use carving blocks sold at art or printing stores. It's nice to begin with erasers because they are so cheap you may be less held back by fear of messing up!):
I saw this video of Geninne's only after I carved my feather stamp. Hers is amazing! (of course :)
Geninne in action

non-video tutorial part 1
non-video tutorial part 2

I confess that I don't have the patience to draw the design first and transfer it onto the eraser as shown in those tutorials. I draw directly on the stamp or just freehand it without drawing at all.

*Tips*

1. If you wear a cotton glove on the hand holding the stamp, you're less likely to get cut if you slip. This may seem unnecessary but it's totally worth it in my opinion :) Those blades are supr sharp.
2. If you will be carving curved lines, it's much easier to have the eraser on a small piece of paper that can slide around easily - then you can twist/turn the eraser itself as you go around corners rather than trying to move the cutter in a smooth, curved line.
3. Start gently. You can always cut deeper later but you can't add back parts you've removed!
4. When you are first getting the hang of this art, you can use all sides of the eraser to practice on. It will save money and be kinder to the environment.
5. If you create any kind of mixed media art, you can also save the shavings you carve off the eraser, mix them with glue or gel medium, and create very funky background textures for paintings etc.


Have fun!

Jul 28, 2011

Flower Within Mandala


I love this mandala - both the regular and the inverted versions make me smile :-)

created using sumopaint.com
source image (an envelope I decorated by hand):

Jun 11, 2011

Inspiration Cloud Mandala

Hmm... this blog seems to be mostly mandalas lately.
I have been doing a huge amount of art journalling/playing and painting.
These mandalas get shared most because they are so easy to post since I don't have to upload and edit images from my camera! And they're sooo much fun to make :-)


The source image for this mandala is a pen and marker drawing I did that I called an 'inspiration cloud' - doodles surrounding an empty place to write inspiring text:

May 10, 2011

Sparkly Mandala


click on image if you'd like to see a larger version


created in Sumopaint.com from source image:

May 2, 2011

Serpent Mandalas


These mandalas are made using Sumopaint.com


The source image is of a beautiful garter snake I met a few summers ago:


Apr 30, 2011

Willow Tree Mandalas

I'm still having so much fun using the graphics programs I learned of recently.

Both of these mandalas had the same source image - weeping willow branches glowing in the sun against a blue sky.


I'm so excited at how they turned out!


Source image:

Apr 7, 2011

In Love With Texture - Sculpture Painting

Now that I am starting to be able to use acrylic paints and glue again as my chemical sensitivities are improving, I am starting to get excited about returning to my first artistic love: TEXTURE building.
I am completely in love with building interesting texture and painting over it.
I use various things to build the texture, gluing on whatever calls to me in the moment.
Tissue paper, fabric, brown paper bags, found objects and dried organic objects like leaves, feathers and seed pods... the possibilities are endless when you have glue and can use it!

Here is a sculpture painting from many years ago that I had a lot of fun making:


And another angle with less glare:


A number of years ago I lived in Montreal which has an amazing system of alleys - awesome places for finding strange little bits of this and that simply crying out to be glued onto something and enjoyed :-)
Most of my 'strange stuff stash' has been packed away, awaiting the day I could use glue again. I think it's time to get it out!


Is there anything you've been saving to use 'one day' that you could dig into right now!?

Mar 6, 2011

Enjoying Silliness... Eerie cat's eyes

I hope to soon have photos of sewing projects to share with you.

Until then... how about some silliness!?

I get such a big kick out of what my partner's iPhone flash does to our cat's eyes in photos and I thought... well... maybe some of you may get a laugh out of it too!
So here are some crappy quality silly cat photos for you:

That pillow was placed vertically to prevent cats from sitting on it and covering it in fur...
... but Spooky was unfoiled in her pillow-sitting plans!


Ninja loves it when we decide to reorganise the pantry.


I just love how Ninja's two differently coloured eyes match the orange and blue fabrics on the chair!


Are there any silly things you like that make you laugh?

Feb 7, 2011

Very Tiny Butterfly Doodle

I recently found some Fiskars squeeze punches at a discount store for $5 each. Wow! They work like a dream.
After testing them out with some white card stock, the little punched pieces suddenly looked like perfect, miniature canvases - just crying out for colour...


This butterfly is about the size of a penny :-)
Materials: micron pens, markers, card stock, punch

For some reason I find that I like doodling on smaller pieces of paper much more than on larger ones.

Do you have a size of paper you prefer doodling on?

Dec 14, 2010

Add Character To Envelopes

I love decorating envelopes before mailing them to people.
I try to keep the decorations simple and quick to do so that if they get damaged in the mail, it's no big deal :-)

Here's an example of one I made recently before sending to a friend who likes blues, turquoises and spirals:


On a piece of paper, I used stamping ink pads for the coloured background, silver pen for the spirals and silver star stickers leftover from my holiday sticker garland project.  Then I glued the piece of paper to the envelope with a gluestick, trimmed the edges, taped the envelope closed and addressed the other side.   All set to go!
It was quick, easy and fun and I hope that it will brighten some postal worker's day.


I try to re-use and re-purpose as much as possible.  The piece of paper was scrap from the recycling bin and the envelope was re-used (hence my needing to tape it closed :)

Dec 8, 2010

A Fun and Frugal Holiday Garland


When I first began working on Christmasy projects a few weeks ago, I had a hard time deciding whether or not to post them on my blog.  I'm not Christian but I love so many things about this holiday.  Since I have a hard time with words, I'd like to borrow from Christie of Grace is Overrated, who perfectly expressed what I had been feeling on this topic.  In a recent post she said, "I didn't want to offend those who might celebrate differently than I do or not at all, for I know that Christmas is not a universal celebration.  Most of all, I want this to be a place where we all feel welcome and appreciated and included."
Thank you Christie, for saying that so well!
I hope that those of you who don't celebrate Christmas will not feel hurt or excluded.  If you'd ever like to adapt one of my projects to a holiday or event you celebrate and want ideas how, please contact me - I'd love to brainstorm.  :-) If you adapt a project and share it online somewhere, please let me know in the comments so I can link to it!  I would love that.
This project in particular lends itself well to any occasion one wants to decorate for.  I love it so much that I plan to make one in rainbows to have up at all times.  Not to celebrate anything (well, I suppose to celebrate my love of rainbows :)

I originally planned to make this garland by punching circles from cool paper and gluing to a string.  I quickly discovered that I didn't have the patience to get the gluestick on the circles and line them up on either side of the string before the glue dried... at least not for the time it would take to make 12 feet of it!  I had the circles all punched out and was very disappointed until I had a sudden brainwave...
Stickers. 
No glue.  No punches.  EASY!  And best of all, FUN because I love stickers.

This holiday garland has some parts that could easily be done by children and some best for adults.

Supplies:

  • tape (I use painters tape because it is easy to unstick from walls, string, fingers etc)
  • 1 package of coloured circle stickers (any colours you like)
  • thread or string (any colour you like - I used silver because I like sparkly things)
  • Optional:  1 package of coloured metallic star stickers (or any sticker you like that is smaller than the circles)

I already had thread and tape on hand so this garland cost about $2 in stickers bought at a dollar store.  If you use only circles, it would be around $1


Step 1. (kid-friendly)

Stick the star stickers onto the circle stickers.  You can use contrasting colours.  I decided I liked how it looked best when the star was the same colour as the circle.  This photo doesn't show it well but when the light hits the stars, they reflect.
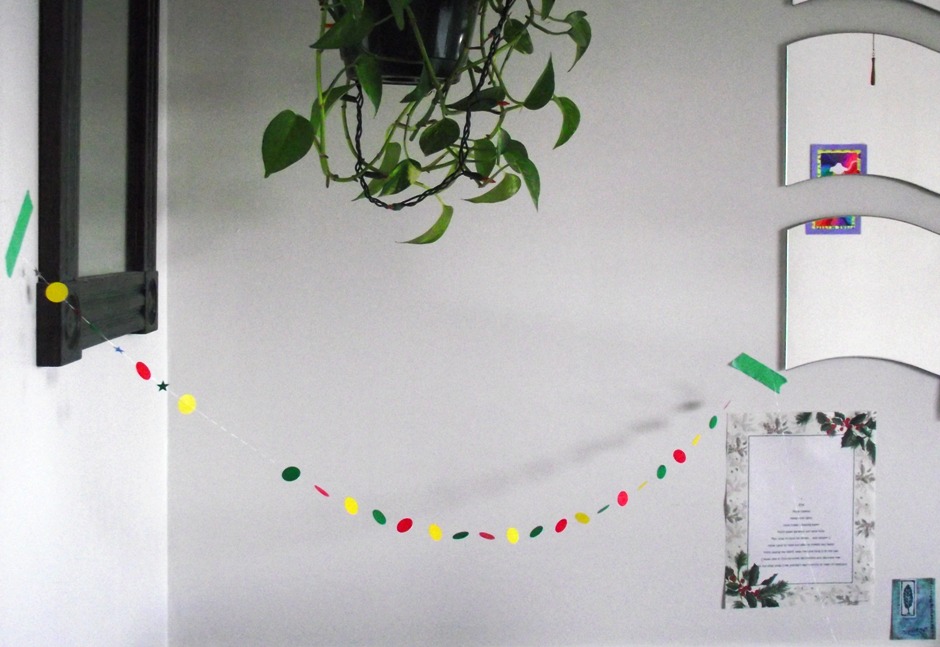
They don't need to be even - this step could easily be done by any age of child that could be trusted with stickers.
Idea: children could also draw on a few of the circles instead of putting stars on them.  They may enjoy later picking out their drawings as they look at the garland.  Another option is to spell out words - 1 letter per circle.


Step 2.

Tape a length of string between 2 walls in a corner.  You could also tape one end to a table and the other to a wall. If you leave the string attached to the spool, then you don't have to calculate how many stickers will fit on what length, just keep on sticking until they are used up!
If you look closely on the left, you can see that I experimented with having circles and stars alternate on the string - it was much too finicky to get the stars to match up evenly so I abandoned that idea.  You can also see that I didn't immediately think of putting the stars on the circles before attaching them to the string!  Trust me, it's way easier to do Step 1 first :-]


Step 3. (not so kid-friendly)

a) Stick the stickers to one side of the string.    I stuck one on the string, pressed the string firmly onto the adhesive and was able to let go while I got the other sticker from the sheet.  This may not work as well if you were using a heavier weight of string. It doesn't have to be in the exact centre.
b) Stick a matching colour of sticker to the other side of the string, lining it up as close as possible to the first sticker.  Don't stress out if they don't match up perfectly.  Once I hung mine, I couldn't even see the mistakes.
c) Decide how far apart you want to space the stickers and repeat steps 3 a) and b) until your garland is as long as you want!

I made a big long garland but this would also look very nice in many shorter strands hanging down vertically from a ceiling.  I used my experimental alternating star/circle piece to hang down from the centre of the garland.


To prevent tangling:
As you fill up the length of string you have taped between the 2 walls, you can loop the finished pieces and tape to the wall like this:
To store:  I will wrap it around a piece of cardboard that I've made notches in each end of, then put in a file folder or envelope.  You could also wrap it around an empty paper towel roll as shown in the photo on this blog: Polka Dot Garland


Hanging: 
When made with thin thread, this garland is very light and airy.  It is held up to the ceiling with Scotch tape and has not threatened to fall down.  I doubt the entire 12 feet would hold with just 2 pieces of tape but I hung it in scalloped sections and it's holding well.


If you try this project, or a variation on it, and post online, I'd love if you'd comment with a link!

Happy decorating!
Related Posts Plugin for WordPress, Blogger...

Followers