Creativity and nature both spark my connection to the sacredness in all things. My connection with the divine is playful and joyful. Never serious yet always sincere.
In a bit of a flurry, I realised this week that I had delayed too long, as usual, in sending cards out. I have store-bought cards I can use, which would have saved time, but my memory dances all over the place and I can't recall which ones I sent to which people last year! I don't really want to send anyone the same card 2 years in a row so I decided to make some by hand. After a few tries, I came up with a design I liked that didn't take too long to complete:
The background is done using the markers & plastic wrap technique I posted about a while back. It's an easy way to get slightly textured looking backgrounds in a snap without using paint. It doesn't warp paper like wet techniques do.
The balls were made by colour copying my red and green paper weaving, using a circle punch and attaching with glue(stick). The 'strings' are sparkly red gel pen.
I decided to brighten up the back of the envelopes using hand-carved eraser stamps. This snowflake is my most recent carved stamp and I am totally in love with it! It was a project that I was daunted by and doubted I could do... and so put off doing for a long time rather than try and fail. When I finally tried it, it worked out wonderfully! I never know when something may turn out to be much easier than I thought it would. :-)
When I first began working on Christmasy projects a few weeks ago, I had a hard time deciding whether or not to post them on my blog. I'm not Christian but I love so many things about this holiday. Since I have a hard time with words, I'd like to borrow from Christie of Grace is Overrated, who perfectly expressed what I had been feeling on this topic. In a recent post she said, "I didn't want to offend those who might celebrate differently than I do or not at all, for I know that Christmas is not a universal celebration. Most of all, I want this to be a place where we all feel welcome and appreciated and included."
Thank you Christie, for saying that so well!
I hope that those of you who don't celebrate Christmas will not feel hurt or excluded. If you'd ever like to adapt one of my projects to a holiday or event you celebrate and want ideas how, please contact me - I'd love to brainstorm. :-) If you adapt a project and share it online somewhere, please let me know in the comments so I can link to it! I would love that. ♥
This project in particular lends itself well to any occasion one wants to decorate for. I love it so much that I plan to make one in rainbows to have up at all times. Not to celebrate anything (well, I suppose to celebrate my love of rainbows :)
I originally planned to make this garland by punching circles from cool paper and gluing to a string. I quickly discovered that I didn't have the patience to get the gluestick on the circles and line them up on either side of the string before the glue dried... at least not for the time it would take to make 12 feet of it! I had the circles all punched out and was very disappointed until I had a sudden brainwave...
Stickers.
No glue. No punches. EASY! And best of all, FUN because I love stickers.
This holiday garland has some parts that could easily be done by children and some best for adults.
Supplies:
tape (I use painters tape because it is easy to unstick from walls, string, fingers etc)
1 package of coloured circle stickers (any colours you like)
thread or string (any colour you like - I used silver because I like sparkly things)
Optional: 1 package of coloured metallic star stickers (or any sticker you like that is smaller than the circles)
I already had thread and tape on hand so this garland cost about $2 in stickers bought at a dollar store. If you use only circles, it would be around $1
Step 1. (kid-friendly)
Stick the star stickers onto the circle stickers. You can use contrasting colours. I decided I liked how it looked best when the star was the same colour as the circle. This photo doesn't show it well but when the light hits the stars, they reflect.
They don't need to be even - this step could easily be done by any age of child that could be trusted with stickers. Idea: children could also draw on a few of the circles instead of putting stars on them. They may enjoy later picking out their drawings as they look at the garland. Another option is to spell out words - 1 letter per circle.
Step 2.
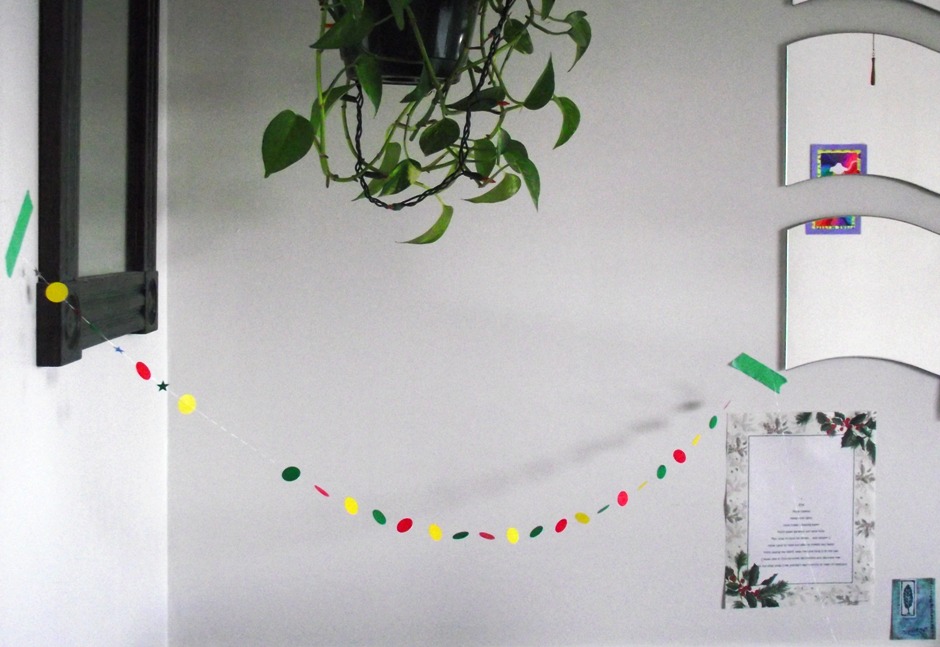
Tape a length of string between 2 walls in a corner. You could also tape one end to a table and the other to a wall. If you leave the string attached to the spool, then you don't have to calculate how many stickers will fit on what length, just keep on sticking until they are used up!
If you look closely on the left, you can see that I experimented with having circles and stars alternate on the string - it was much too finicky to get the stars to match up evenly so I abandoned that idea. You can also see that I didn't immediately think of putting the stars on the circles before attaching them to the string! Trust me, it's way easier to do Step 1 first :-]
Step 3. (not so kid-friendly)
a) Stick the stickers to one side of the string. I stuck one on the string, pressed the string firmly onto the adhesive and was able to let go while I got the other sticker from the sheet. This may not work as well if you were using a heavier weight of string. It doesn't have to be in the exact centre. b) Stick a matching colour of sticker to the other side of the string, lining it up as close as possible to the first sticker. Don't stress out if they don't match up perfectly. Once I hung mine, I couldn't even see the mistakes. c) Decide how far apart you want to space the stickers and repeat steps 3 a) and b) until your garland is as long as you want!
I made a big long garland but this would also look very nice in many shorter strands hanging down vertically from a ceiling. I used my experimental alternating star/circle piece to hang down from the centre of the garland.
To prevent tangling:
As you fill up the length of string you have taped between the 2 walls, you can loop the finished pieces and tape to the wall like this:
To store: I will wrap it around a piece of cardboard that I've made notches in each end of, then put in a file folder or envelope. You could also wrap it around an empty paper towel roll as shown in the photo on this blog: Polka Dot Garland
Hanging:
When made with thin thread, this garland is very light and airy. It is held up to the ceiling with Scotch tape and has not threatened to fall down. I doubt the entire 12 feet would hold with just 2 pieces of tape but I hung it in scalloped sections and it's holding well.
If you try this project, or a variation on it, and post online, I'd love if you'd comment with a link!
Have you played with Wordle yet?
I love it. :-)
Basically you go to the Create page, type (or paste) text, hit the Go button and edit how you'd like the words to appear (horizontal, rounder edges, random shape, font, colours etc). You can edit a custom colour pallette like I did with this Holiday-themed Wordle. The more times a word appears in your piece of text, the larger it will be. Therefore, if you want different sized words, you will need to have some words appear more than once.
You can write your own text or play around with copying and pasting poems, songs or writing from online sources.
One of the few things I don't like about Wordle is that it doesn't make an image file you can save. I got around this by using the ridiculously easy screen shot tool in Windows Vista called the Snipping Tool (which I just discovered today and am very excited about :)
~
I've been intending to take part in Aimee's fun List It Tuesday for a while but I never seem to get around to writing a list by hand, photographing it, uploading, editing... and then posting here.
So I decided to make a list in Windows Paint today instead. It's a real bugger to work with so it helps me to relax, knowing that my drawings will look amateur no matter what I do :-) Somehow that stops me from being too perfectionist.
Here's my list of Christmas-y things I'd like to do:
I'm an artist living in southwestern Ontario. I believe that there is immense healing power in being creative. I feel closest to 'sacredness' and 'divinity' when I am being creative and when I am in nature. I love gardening, reading, animals, kindness, understanding and being gentle with our amazing bodies and wonderful planet! I am on a healing journey of mind, body and spirit. In addition to this creativity blog, I also blog about steadilyrecovering from severe MCS - multiple chemical sensitivity and I share prose & poetry occasionally over at May Words Flow as an experiment in working through cognitive function issues. Click Here To See My Blogger Profile
How to make backgrounds that won't warp thin paper





 Posts
Posts