This is a very old site, but I'd like to still keep it active so I'll be converting it to the new Google Sites. I have no idea what the new look will be like. Probably very bare bones!
Sep 22, 2020
site changes
Feb 4, 2013
How To Make A Digital Mandala
VERY basic directions for making digital mandalas using the program SumoPaint. :-)
Go to
http://www.sumopaint.com/app/
Click Open From Computer (if you want to use an image of your own)
Select an image
Click Open
Click on Filters (right below address bar)
Hover your mouse over Distort
Select Kaleidoscope
Then you can change the number of sides, zoom in our out, drag the little circle to change what area is focused on etc
when done, click OK
Totally optional:
You can play with it more under Adjustments, Filters etc
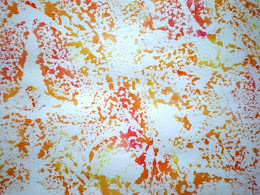
You can turn an image like this:

Into a mandala like this:

Go to
http://www.sumopaint.com/app/
Click Open From Computer (if you want to use an image of your own)
Select an image
Click Open
Click on Filters (right below address bar)
Hover your mouse over Distort
Select Kaleidoscope
Then you can change the number of sides, zoom in our out, drag the little circle to change what area is focused on etc
when done, click OK
Totally optional:
You can play with it more under Adjustments, Filters etc
You can turn an image like this:

Into a mandala like this:

Jun 30, 2012
Make Your Own Stencil For Fabric Painting - Condor Shirt

How are you all dealing with the heat and humidity? Today I distracted myself with a new creative project.
I am really drawn to condors and I decided to try making a stencil that I could use for putting a condor silhouette onto a Tshirt. I know that some people use freezer paper for this. I didn't have any and I also wanted the stencil to last through many uses so I decided to use poster board. You could also use bristol board or thick card stock. This is the first time I've used Tulip fabric spray paint and it was much thinner than I expected. I don't know if the poster board will last through the first use without warping so I plan to put a coat of acrylic paint on both sides first.
I found a condor silhouette that I liked using Google Image search. Then I edited it in Paint to remove most of the black (saves printer ink).
Here are photos and notes of the process. If you can't read the text, please click on the image to make it larger - the blurriness goes away.
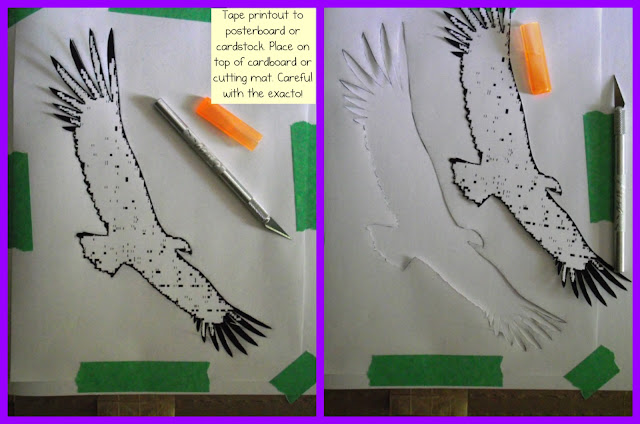


I'm really happy with the results! :-)

Photo collages and effects created using the free program http://fotoflexer.com
May 21, 2012
Painting On Raw Canvas - Experimentations

Raw canvas was on sale at my local art store recently for $0.75/foot. I was able to get two 3'x5' piece for only $7.50!! Wow. I've always wanted to paint on a larger size of canvas but was daunted by the price of big stretched canvases.
Raw or 'unprimed' canvas hasn't been painted/primed with gesso so it will soak up paint like mad. This makes it not as inexpensive as it may seem because you will spend a lot in paint when you use it.
I did some experimenting to find ways around this and am sharing the results, so far, with you here. This is an incomplete work in progress. I intend to leave this unstretched and use it as a wall-hanging when complete.
1. I washed the canvas in hot water with laundry soap and baking soda. I didn't wash anything else with these because I didn't want them to get bunched up and crease badly. I did not to use fabric softener.
2. Cut away shredded bits that had frayed at the cut ends. Then I dried the canvas in the dryer (once again NO fabric softener - it can prevent paint from adhering).
3. Removed from dryer right away and ironed. This would have been hard on an ironing board so I used the kitchen table. Because I had 2 pieces of canvas, I doubled them over so there were 4 layers of canvas between the table and ironing board at once, then flipped, rotated as needed to iron all of the canvas. I used a spray bottle to dampen the canvas and high heat.
What I was left with: the washing, drying and ironing shrank the canvas a bit and made the weave tighter. Exactly what I was hoping for.
My plan was to use watered down super cheap paint to cover the canvas so that I could paint on it later with less cheap paint. However, I think I am liking the look of this so much, that it will become the actual painting - not just a background. I used the Michael's store brand 2oz bottles that cost $0.69/bottle. I've covered tons of the canvas so far and used less than 5 bottles! Assuming I use 6 by the time I am done that will be $4 of paint. Far more affordable than gessoing the canvas.
I planned to make a big mess so I took this project out onto the deck with an old sheet under it (and books to weigh down corners due to wind).

I did some weeding:

detail of weeds which will serve as a 'resist', leaving areas unpainted under them:

Acrylic paint mixed with water (a bit more than half water) and sprayed using the Tulip Fabric Paint Cannon:

Spraying a layer of pink:

Adding a few objects and then spraying yellow:

Spraying white, then removing all objects:

detail of weed resist area:

I waited for the top layer to dry - very fast since it was a sweltering hot, sunny day.
Then I flipped the canvas over and and began applying the paint to the back with a big brush, adding water as needed with the brush. This side looks very primary but I will paint over it later and this canvas will become double-sided - I can rotate it on a whim :)


One of the parts of this piece that I love most is the way the colour gradation shows through in the three diagonal lines in the corner:

I put my second piece of canvas under the piece I was painting part way through - as soon as I saw what cool effects were bleeding through onto the old sheet. I wanted them on the blank canvas instead!

Would I do anything differently if I did this again?
Yes - first of all I would use more than one finger for holding down the spray nozzle! :-)
I also would leave more areas raw, with only sparse splatter on them, because of how much I love the bleeding through effect.
Mar 26, 2012
Arashi Shibori Style Tshirt Alteration
Something I've been loving recently is using a silk dying technique called Shibori.
I use very watered down acrylic paints as a fabric paint rather than fabric dyes and I'm using non-silk fabric so what I'm doing isn't actually Shibori - but that is what has inspired and informed me.
The particular Shibori technique I've been using is called Arashi aka Pole Wrapping. Usually it's done on a diagonal but with this Tshirt, I've done it vertically. I wasn't too careful about making the top of the paint be in an evenly horizontal line which is driving me a bit nuts but I don't notice it much when I wear it so hopefully I will be able to ignore it :)
For those interested in trying this, I didn't even buy any special supplies (eg PVC pipe, sinew or waxed twine).
I covered an old cardboard tube with a plastic bag (so it wouldn't get soggy when it got wet) and used a rubber band to hold each end of the shirt on and used waxed dental floss to wind around. I'm sure twine would be easier on the hands (dental floss is so thin and my fingers were pretty sore afterward) but I like using what I have on hand. When I'm done, I unwrap the floss and wind it onto an old cardboard toilet paper roll to re-use for future Shibori :)
Because the paint was applied by hand to a mostly dry Tshirt, most of the colour stayed on the top exposed layer of the shirt. When using a dye bath or having the shirt very wet first, more of the colour will spread through other layers.
I washed and dried once before wearing. I've had great success using inexpensive acrylic 'craft' paint instead of fabric paint. It does need to be watered down to avoid being stiff or crunchy. I've never used any of the additives you can buy to 'transform' acrylic paint into fabric paint.
This was a plain orange Tshirt and I was hoping for a flame-like effect along the bottom of the shirt:


Check out this great post showing various Shibori techniques: DIY Shibori
Jan 10, 2012
Red Star Mandala

When I want to create but have little energy, I often turn to the free graphics editing program Sumopaint and make mandalas from images I already have on hand.
This mandala was created from a photo of a painting in progress (shown below).
I really love how the texture of the canvas itself shows up in this mandala and makes beautiful, feathery lines.
The painting in progress is small and simple so far. I'm enjoying the colours.

Golden Light
5"x7"
acrylic on canvasboard
5"x7"
acrylic on canvasboard
Jan 2, 2012
Alien Spires Painting In Progress
I recently was given some canvasboard by my stepdad who no longer wanted his paintings.
I'm finding it really interesting how the way I paint is changed by having images by another person as an underpainting.
At first I thought I wanted to mask areas of his paintings and then have them showing through when my painting was finished... but it didn't look right to me.
You can see some of his original concentric circles showing through in this version. I have already added a coat of paint so the original colours aren't present but the shapes are:

One thing that was really excellent about this experiment was how my choice of colour was influenced by the previous painting. It led me to choose colours and combinations of colours that I wouldn't have normally. I like being stretched like this and I now have a greater appreciation for why some artists sometimes choose a 'pallette' and constrain themselves to it.
There are still changes I plan to make to this painting, areas and colours that I want to change, but for those who enjoy seeing parts of the process, here's how it looks now:
 I'm still a bit frustrated by the way the blue 'tower' on the right appears to lean toward the left (rather than looking like the pink and gold shape is in front of it) but I think I know how to fix that by having a bit of it peek out from the lower left side of that shape.
I'm loving the glowing goldy colours (which are much gentler without the flash glare :)
Dec 25, 2011

Dec 21, 2011
Free Intuitive Heart eCourse by Lauren Luquin
Have you checked out this beautiful ecourse yet?
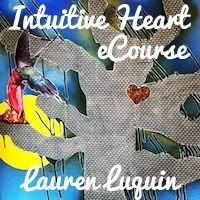
Lauren, beautiful soul that she is, decided to offer it for free!
You can read her lyrical, eloquent description of the course by clicking the image above.
Participants decide their own level of participation, no pressure or expectations.
:-)
That's perfect for me - I'm in hibernation mode right now, moving slowly and being cautious about commitments.
Lauren notes:
"*all Intuitive Heart members will get 11% off everything in my Etsy shop,
VisionWise - Earth Livity 1111, for the duration of the course*"
Sep 30, 2011
Painting In Progress 1
I've been painting a lot more recently since I tackled (part of) the mess in my studio.
I'm so excited to have my health returned to a level where I can use acrylic paints and glue again! I am returning to my first love of using texture in painting.
Here's a work in progress:

first, paint, then a layer of glue-water mix - half and half, that I used to attach repurposed biodegradable packing peanuts! They end up shrinking and collapsing in fun ways:
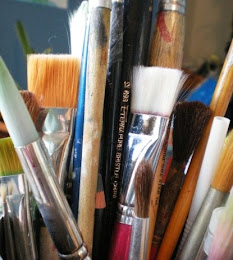
 It's great to keep old, damaged brushed to use for glue since the glue wrecks a little more each time anyway. You can get more life from a glue brush by washing it with HOT water and soap as soon as possible after using. I use an old toothbrush with soap right on it to scrub the glue brush.

then I used the same glue-water mix to attach pieces of printed napkins. Once the glue dries, the part of the napkin that was white becomes transparent so that just the printing shows. Flowers and a butterfly:

I have since painted the packing peanuts a shimmery pearl white and now I feel stuck in that place of wanting to add more... but afraid of messing it up!
I have soooo many paintings in an unfinished state because of this.
If you'd like to see amazing examples of fearless layered paintings, check out Tara Leaver. She is awesome! And she takes the time and effort to share photos of each step of her panting journeys! Such dedication and patience! I have learned so much as an artist from following her blog.
I'm so excited to have my health returned to a level where I can use acrylic paints and glue again! I am returning to my first love of using texture in painting.
Here's a work in progress:

first, paint, then a layer of glue-water mix - half and half, that I used to attach repurposed biodegradable packing peanuts! They end up shrinking and collapsing in fun ways:
 It's great to keep old, damaged brushed to use for glue since the glue wrecks a little more each time anyway. You can get more life from a glue brush by washing it with HOT water and soap as soon as possible after using. I use an old toothbrush with soap right on it to scrub the glue brush.
then I used the same glue-water mix to attach pieces of printed napkins. Once the glue dries, the part of the napkin that was white becomes transparent so that just the printing shows. Flowers and a butterfly:

I have since painted the packing peanuts a shimmery pearl white and now I feel stuck in that place of wanting to add more... but afraid of messing it up!
I have soooo many paintings in an unfinished state because of this.
If you'd like to see amazing examples of fearless layered paintings, check out Tara Leaver. She is awesome! And she takes the time and effort to share photos of each step of her panting journeys! Such dedication and patience! I have learned so much as an artist from following her blog.
Subscribe to:
Posts (Atom)

This work is licensed under a Creative Commons Attribution-Noncommercial-No Derivative Works 2.5 Canada License.